Mastering Python’s Class Nesting: A Deep Dive
Read Time:8 Minute, 30 Second
Python, renowned for its simplicity and versatility, offers a rich array of programming concepts and features to accommodate various coding needs. Among these, inner (nested) classes stand as a powerful yet often underutilized tool in this programmer’s toolkit. In this tutorial, we embark on a journey to unravel the intricacies of inner classes and demonstrate how they can be harnessed to enhance the structure and functionality of your programs.
Throughout this tutorial, we will delve into the fundamental concepts of inner classes, explore the scenarios where they shine, and illustrate their practical applications in Python programming. Whether you’re a novice programmer seeking to expand your knowledge or an experienced developer looking to refine your coding skills, this tutorial promises to be an invaluable resource for mastering the art of inner classes in it. So, let’s embark on this enlightening journey together and unlock the potential of nested classes within Python.
Understanding Inner (Nested) Classes in Python
In the realm of object-oriented programming, classes are fundamental building blocks. In Python, classes are no different. They serve as blueprints for creating objects, which encapsulate both data and methods to manipulate that data.
Delving Deeper: The Concept of Nested Classes
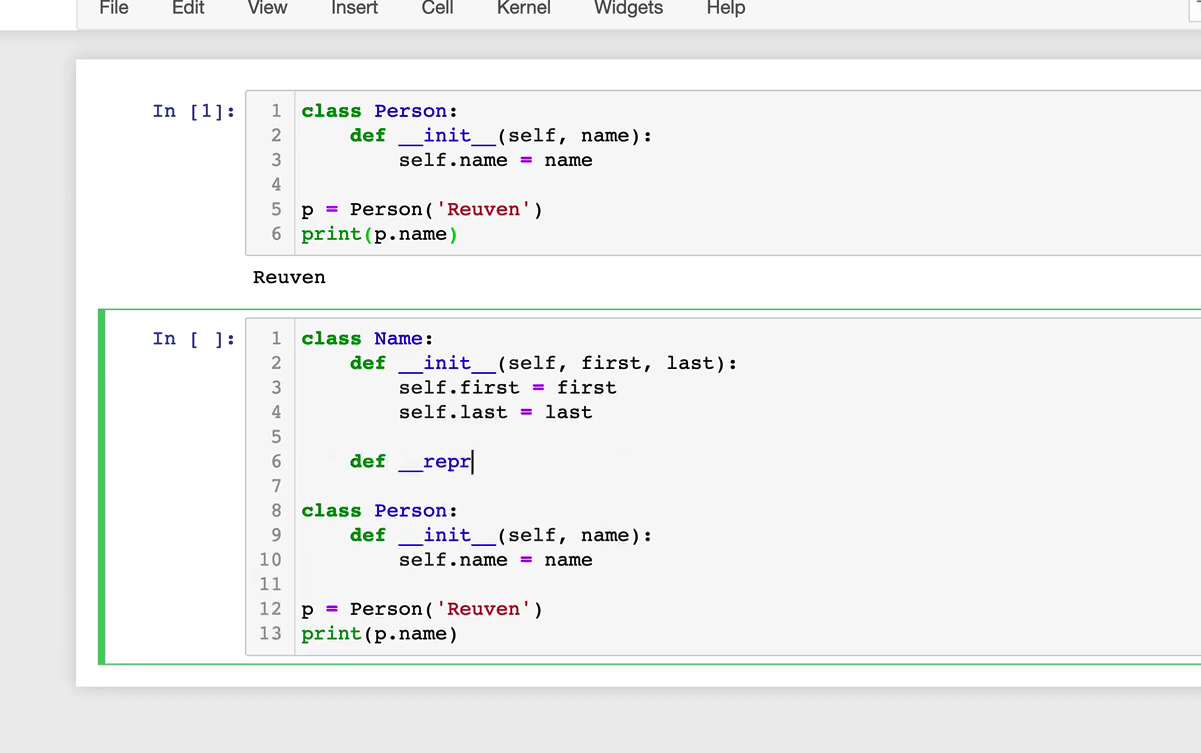
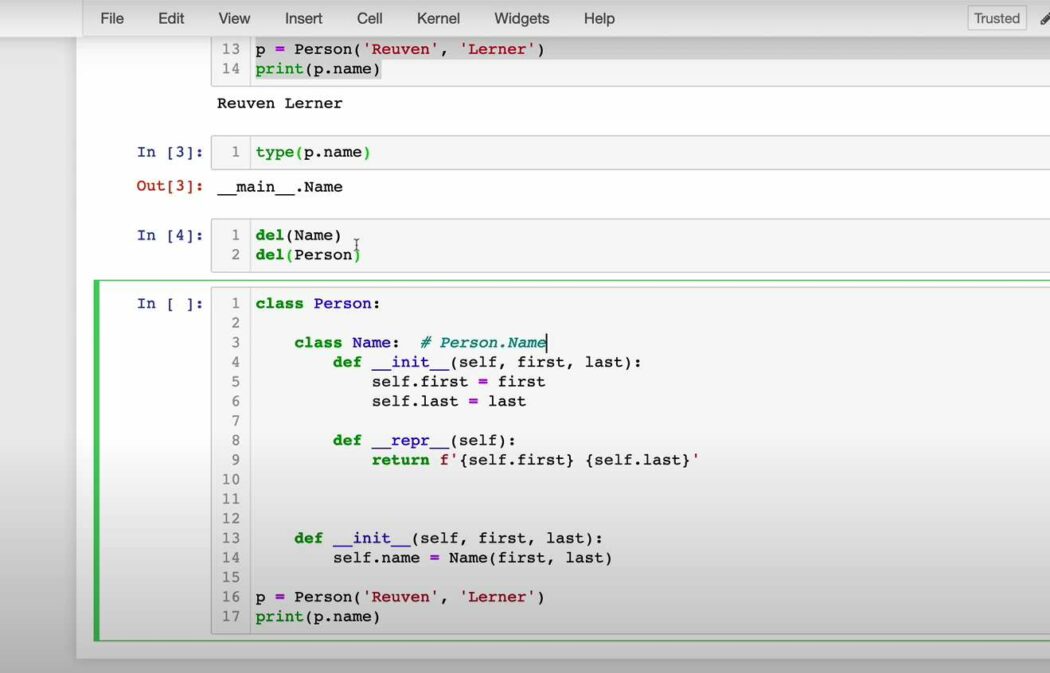
In the same way that functions can be nested within other functions in Python, classes too can be nested within other classes. These are referred to as inner (or nested) classes. Such a structure allows for a more organized and modular approach to design, particularly when one class logically belongs inside another.
Example of Nested Functions:
def outer_function():
    def inner_function():
        print("Greetings from the inner function!")
    return inner_function()
Example of Nested Classes:
class OuterClass:
    class InnerClass:
        def display(self):
            print("Greetings from the inner class!")
Advantages of Using Nested Classes
- Encapsulation: Nested classes allow for a more fine-tuned encapsulation. If a class makes sense only within the context of another class, it’s logical to nest it. This can hide the inner class from the global scope, protecting its implementation details;
- Logical Grouping: By using nested classes, related components can be kept together. This makes the code easier to navigate and understand;
- Enhanced Readability: A well-structured codebase with clear groupings can lead to improved readability. A nested class can sometimes clarify the relationship between the components and their hierarchical significance.
Unlocking the Power of Inner (Nested) Classes in Python: A Comprehensive Guide
Inner (nested) classes, although not a frequently encountered concept, are a gem in the world of object-oriented programming in Python. If you’re an intermediate to advanced Python developer engaged in multiple projects, understanding and employing inner classes can significantly enhance your coding skills and the readability of your codebase. In this comprehensive guide, we’ll explore when and why you should leverage inner classes, providing you with valuable insights, examples, and best practices.
When Should You Use Inner (Nested) Classes?
Inner classes can be a game-changer in your Python programming journey, and here’s why:
1. Improved Code Structure:
Inner classes enable you to craft cleaner, more organized code. They help you modularize your codebase, breaking it down into smaller, more manageable pieces. This makes your code more understandable and maintainable.
2. Enhanced Object Orientation:
By using inner classes, you can create a more object-oriented design. This is particularly beneficial when you’re dealing with related classes, as you can encapsulate one class within another, establishing a clear hierarchy.
3. Code Readability and Knowledge Transfer:
Inner classes contribute to code that’s easy to read and comprehend. This is invaluable when collaborating with other programmers on the same project. Your code becomes more friendly and accessible to team members, fostering knowledge transfer.
4. Encapsulation and Data Hiding:
Inner classes allow you to hide the implementation details of a class within another class, promoting encapsulation. This protects your code from unintended modifications and enhances data security.
5. Effective Code Reuse:
Nested classes facilitate the assembly of code from different Python files. Each team member can manage the class they’re working on separately. Importing classes from other files becomes seamless, promoting code reuse and collaboration.
How to Use Inner (Nested) Classes Effectively
Now that you understand the benefits, let’s dive into some tips and best practices for using inner classes effectively:
1. Choose Nested Classes Wisely:
Reserve inner classes for situations where you need a clear hierarchy or encapsulation. Overusing them can lead to code complexity.
2. Maintain Clarity:
Ensure that your inner classes have meaningful names that reflect their purpose within the outer class. This enhances code readability.
3. Follow PEP 8 Guidelines:
Adhere to Python’s PEP 8 style guide when naming your inner classes and organizing your code. Consistency in coding style is crucial.
4. Document Your Code:
Provide clear and concise docstrings and comments for both the outer and inner classes. Good documentation is essential for understanding and maintaining your codebase.
5. Test Thoroughly:
Write unit tests for your inner classes just like you would for any other part of your code. This ensures that they work as intended and maintains code reliability. To grasp the concept of inner classes better, let’s explore a few real-world examples:
Diving Deep into Nested Classes in Python
In Python, classes can contain other classes. This encapsulation, called nested or inner classes, helps in organizing code by keeping related entities together. Let’s embark on a journey to understand this concept better with a practical example.
Constructing the Main Class
Start by building a main class. Imagine creating a blueprint for a computer. Each computer has a unique identifier; in this case, consider it “PC001”.
class Computer:
    def __init__(self):
        self.identifier = "PC001"
Executing the script and initializing an instance of the Computer class will yield the identifier “PC001”.
Delineating Computer Components
A computer isn’t just an entity. It comprises multiple components. To represent the intricate relationship between a computer and its components, nested classes can be leveraged.
Consider the two primary components of a computer: its operating system (OS) and the central processing unit (CPU). These can be conceptualized as:
class OperatingSystem:
    def platform(self):
        return "Windows 10"

class CentralProcessingUnit:
    def brand(self):
        return "Intel"
    def version(self):
        return "Core-i7"
However, rather than keeping these classes separate, they can be nested inside the main Computer class for a cleaner and more organized representation:
class Computer:
    def __init__(self):
        self.identifier = "PC001"
        self.os = self.OperatingSystem()
        self.cpu = self.CentralProcessingUnit()

    class OperatingSystem:
        def platform(self):
            return "Windows 10"

    class CentralProcessingUnit:
        def brand(self):
            return "Intel"
        def version(self):
            return "Core-i7"
Interacting with the Nested Structure
Upon instantiating the Computer class, one can directly access the nested classes and their methods:
if __name__ == "__main__":
    my_computer = Computer()
    computer_os = my_computer.os
    computer_cpu = my_computer.cpu
    print(my_computer.identifier)
    print(computer_os.platform())
    print(computer_cpu.brand())
    print(computer_cpu.version())
This should display:
PC001
Windows 10
Intel
Core-i7
Advantages
- Code Organization: By keeping related components together, code becomes more readable and maintainable;
- Encapsulation: Nesting classes can hide the inner workings and complexity of sub-components, ensuring that the top-level class interacts with a well-defined interface;
- Flexibility: Inner classes can be updated or modified without disturbing the main class, provided they maintain a consistent interface.
Distributing Inner Classes Across Separate Files in the Directory
Once a codebase is established with inner classes in Python, ensuring that it remains structured, efficient, and collaborative becomes paramount. The decision to structure the code in a more object-oriented manner, where various inner classes represent the elements of a computer system, is a commendable one. However, the challenge arises when multiple developers are collaborating on the same project.
Let’s paint a scenario. Imagine a dedicated team of software engineers: John, Maria, and Sam, each working on distinct components of a computer system:
- John is in charge of the Computer() class;
- Maria handles the functionality within the OS() class;
- Sam focuses on developing the CPU() class.
Currently, the project’s directory has a single file, main.py, where all these classes reside:
└─── ComputerProject
└─── main.py
While this structure appears concise, it is not ideal for collaborative work. As the codebase grows and multiple contributors make concurrent changes, the potential for confusion and merge conflicts increases significantly.
A more efficient solution is to modularize the code. By splitting each class into separate Python files within the directory, collaboration becomes more streamlined. The directory could be structured as follows:
└─── ComputerProject
├─── main.py
├─── os_work.py
└─── cpu_work.py
Here’s a breakdown:
The os_work.py file will be dedicated to the Operating System functionalities:
class OS():
    def system(self):
        return "Windows 10"
The cpu_work.py will concentrate on the CPU details:
python
Copy code
class CPU():
    def make(self):
        return "Intel"
    def model(self):
        return "Core-i7"
Now, since each class resides in its designated file, there’s no need to define them inside the Computer() class in main.py. Instead, these classes can be imported directly. The main.py will then be structured as:
from os_work import OS
from cpu_work import CPU

class Computer():
    def __init__(self):
        self.name = "PC001"
        self.os = OS()
        self.cpu = CPU()

if __name__ == "__main__":
    my_comp = Computer()
    my_os = my_comp.os.system()
    my_cpu_make = my_comp.cpu.make()
    my_cpu_model = my_comp.cpu.model()
    print(my_comp.name, my_os, my_cpu_make, my_cpu_model)
This modular approach ensures the output remains consistent:
PC001
Windows 10
Intel
Core-i7
This newly organized codebase offers better readability and ease of collaboration. Each engineer can now work on their respective file, making necessary adjustments without affecting the other parts of the code. This approach reduces potential merge conflicts and fosters a more harmonious development environment.
Conclusion
In this tutorial, we delved into the concept of inner (nested) classes within Python, gaining a comprehensive understanding of their nature, purpose, and the techniques for effectively integrating them into our codebase to enhance its structural integrity.
Please do not hesitate to share your questions or offer any recommendations in the comment section below.
Happy
0 %
Sad
0 %
Excited
0 %
Sleepy
0 %
Angry
0 %
Surprise
0 %
Average Rating